
Creating the famous Bloomin Fried Chicken at home allows you to enjoy that signature crispy, spice-forward crust whenever the craving strikes. By pounding the chicken breast thin and using a specialized buttermilk dredge, you achieve the perfect balance of tender meat and a hearty, golden coating that mirrors the beloved restaurant original. This recipe is designed for those who appreciate a bold, seasoned crunch in their fried chicken.
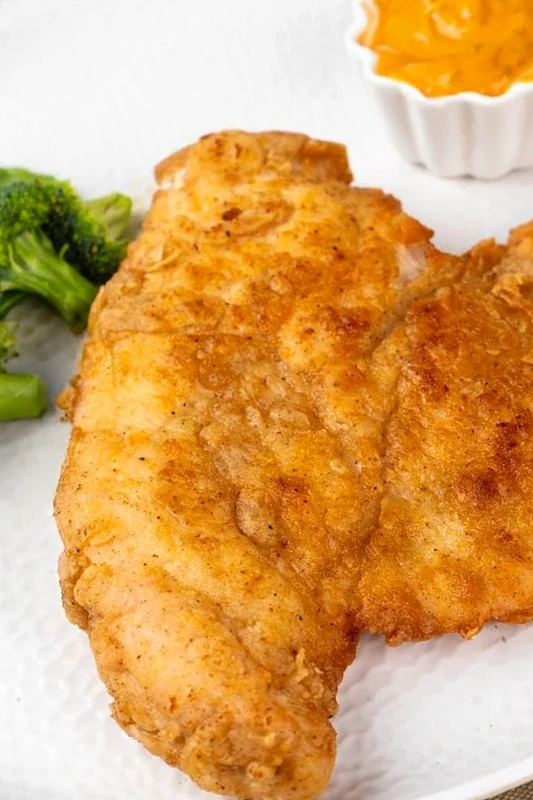
List of ingredients
- 1 lb. Boneless Chicken Breast (sliced, pounded)
- ½ Cup All-Purpose Flour
- 1 Cup Buttermilk
- 3 Tablespoons Oil (for frying)
- 2 Teaspoons Seasoned Salt
- 1½ Teaspoon Cayenne Pepper
- 1 Teaspoon Smoked Paprika
- ¼ Teaspoon Garlic Powder
- ¼ Teaspoon Black Pepper
- 1 Cup Water
step-by-step instructions
- Step: Flatten the chicken bread by rolling it out with a rolling pin.
- Step: Now mix buttermilk with a splash of water and stir nicely.
- Step: For the dry coating, mix flour with salt, black pepper, garlic powder, smoked paprika, and cayenne pepper.
- Step: Coat the chicken first with the dry mixture, then dip it into the buttermilk slurry, and repeat.
- Step: Place the coated chicken breast on a wire rack to allow any excess coating to fall off.
- Step: Further, take a pan, add oil, place your coated chicken breast fillet, and fry until golden brown.
- Step: Garnish it with cilantro and pair it with blooming sauce for a delicious treat.
Keys to Professional Frying Results
Maintaining Optimal Oil Temperature
The secret to achieving the quintessential crispy crust without burning the exterior lies in strict heat management. Using a heavy cast-iron skillet helps maintain a steady temperature throughout the frying process, preventing the oil from fluctuating too wildly when the cool chicken is introduced. Aim to keep your oil at a medium-high heat; if the oil is too cool, the chicken will absorb excess fat and become greasy, whereas oil that is too hot will scorch the spices before the center of the chicken is fully cooked.
The Role of Double Dredging
Repeating the flour-dip-flour process creates a significantly more durable and crunchy exterior than a single dip would provide. The first layer acts as a primer, while the second application of flour, once hydrated by the buttermilk, develops into the thick, flaky, and golden-brown shell associated with restaurant-style fried chicken. For the best outcome, press the flour firmly onto the meat during the second dredging step to create extra nooks and crannies that will catch the oil and turn exceptionally crisp.
Refining Your Coating Technique
Why Resting the Breading Matters
The instruction to let the coated chicken sit on a wire rack is not merely for convenience; it allows the dry ingredients to fully hydrate and bond with the proteins in the buttermilk and chicken. When you skip this step, the dry flour often slides off the chicken as soon as it hits the hot oil, leaving you with patchy, uneven results. A five-minute rest ensures the coating is sufficiently “set” so that you get that cohesive, crunchy bite you expect.
Selecting the Best Buttermilk Alternative
If you find yourself without traditional buttermilk, you can replicate the acidity and texture by combining one cup of regular milk with a tablespoon of lemon juice or white vinegar. Allow this mixture to sit undisturbed for about ten minutes until it thickens slightly before using it in your dredging slurry. This homemade version provides the necessary tang to tenderize the chicken fibers effectively, ensuring that even after a quick fry, the meat remains moist and flavorful.
Common Queries About Preparation
How do I verify the chicken is safely cooked?
The most accurate method to confirm the chicken is ready is to use an instant-read meat thermometer inserted into the thickest part of the fillet. You are looking for a final internal temperature of 165°F (74°C), which ensures the meat is perfectly cooked through while staying juicy. If you do not have a thermometer, slice into the center of the thickest piece to ensure the juices run clear and there is no remaining pink color.
Can I prepare the breading mixtures in advance?
You can certainly mix the dry flour and spices well ahead of time and keep them in a sealed bag or container until you are ready to cook. However, it is best to prepare the buttermilk slurry just before you begin frying to keep the consistency thin and fresh. Having the dry spices pre-mixed saves considerable time during the actual cooking phase, allowing you to move quickly from the refrigerator to the frying pan.
What is the best way to keep the chicken crispy?
To keep your chicken crispy after frying, avoid stacking the cooked fillets on top of each other, as the steam released from the hot meat will quickly soften the breading. Instead, keep the finished pieces on a wire rack set over a baking sheet, which allows air to circulate underneath the chicken. If you are cooking a large batch, you can keep the already-cooked pieces in a low-temperature oven, around 200°F, to stay warm without losing their crunch.
Dietary Adjustments and Flavor Variations
Making the Recipe Gluten-Free
You can easily adapt this dish for a gluten-free diet by substituting the all-purpose wheat flour with a high-quality gluten-free all-purpose blend. Many of these blends contain rice flour or xanthan gum, which actually helps create a very crispy crust that holds up well during deep frying. Ensure that your seasoned salt and other dry spices are certified gluten-free, as some commercial blends may contain hidden wheat-based anti-caking agents.
Adjusting the Heat Level
The cayenne pepper provides a signature kick, but you can customize the heat to suit your family’s preferences by adjusting the ratio of cayenne to smoked paprika. If you prefer a milder version, reduce the cayenne to half a teaspoon and increase the smoked paprika to one and a half teaspoons for a deeper, earthier profile. Conversely, if you enjoy more intense heat, adding a dash of ground chipotle pepper will introduce both more spice and a deeper smoke profile that pairs beautifully with the crispy coating.
Managing Leftovers and Reheating
Proper Refrigeration Methods
If you have leftovers, allow the chicken to cool down completely to room temperature before placing it into an airtight container. Placing hot chicken into a container will create trapped steam, which will destroy the texture of your crispy crust within minutes. When stored properly in the refrigerator, the cooked chicken will remain safe and flavorful for up to three days, provided the container is sealed tightly to prevent it from drying out.
Techniques for Successful Reheating
To restore the original texture of the breading, avoid the microwave, which tends to leave the chicken soggy and rubbery. Instead, place the chicken pieces on a baking sheet and heat them in a preheated oven at 375°F for about ten to twelve minutes until the crust is hot and re-crisped. Alternatively, using a toaster oven or air fryer at 350°F for a few minutes will yield even better results by circulating hot air around the crust, effectively mimicking the initial frying process.
Optimizing Equipment for Better Results
Choosing the Right Cooking Surface
A heavy-duty cast-iron skillet is highly recommended because it offers superior heat retention, ensuring the oil temperature does not drop drastically when you add the chicken. If you use a thin-walled pan, the oil might cool too quickly, leading to a greasy crust that fails to achieve that iconic golden color. Always use enough oil to cover at least halfway up the thickness of the chicken fillet, as this ensures even browning on both sides without needing to constantly flip the meat.
The Importance of Wire Racks
Using a wire rack is non-negotiable for high-quality fried chicken, as it prevents the bottom of the fillet from sitting in pools of residual oil. When fried food sits on a flat plate or paper towel, the bottom side steams itself, becoming soft and mushy within seconds. A wire rack facilitates airflow on all sides, ensuring that the moisture trapped in the coating can escape, keeping your finished dish as crispy as the first piece you pulled from the pan.
Print
Copycat Outback Steakhouse Bloomin Fried Chicken Recipe
- Total Time: 30 minutes
- Yield: 2 servings 1x
- Diet: Non-Vegetarian
Description
The Outback Steakhouse Bloomin Fried Chicken is thinly pounded chicken covered in the same breading as the famous Bloomin onion. You can serve the chicken with the signature Bloomin sauce and just relish in its crispy, savory taste.
Ingredients
- 1 lb. Boneless Chicken Breast (sliced, pounded)
- ½ Cup All-Purpose Flour
- 1 Cup Buttermilk
- 3 Tablespoons Oil (for frying)
- 2 Teaspoons Seasoned Salt
- 1½ Teaspoon Cayenne Pepper
- 1 Teaspoon Smoked Paprika
- ¼ Teaspoon Garlic Powder
- ¼ Teaspoon Black Pepper
- 1 Cup Water
Instructions
- Step: Flatten the chicken bread by rolling it out with a rolling pin.
- Step: Now mix buttermilk with a splash of water and stir nicely.
- Step: For the dry coating, mix flour with salt, black pepper, garlic powder, smoked paprika, and cayenne pepper.
- Step: Coat the chicken first with the dry mixture, then dip it into the buttermilk slurry, and repeat.
- Step: Place the coated chicken breast on a wire rack to allow any excess coating to fall off.
- Step: Further, take a pan, add oil, place your coated chicken breast fillet, and fry until golden brown.
- Step: Garnish it with cilantro and pair it with blooming sauce for a delicious treat.
Notes
Pound the chicken breast thin and flat so that each piece cooks evenly. Coat the chicken twice to achieve beautiful, crispy bits of texture. If preparing the signature bloomin’ sauce, chill it for at least 30 minutes to allow flavors to blend.
- Prep Time: 10 minutes
- Cook Time: 20 minutes
- Category: copycat
- Method: deep-frying
- Cuisine: American
Nutrition
- Serving Size: 1 breast
- Calories: 198 kcal
- Sugar: 6 g
- Sodium: 2454 mg
- Fat: 5 g
- Saturated Fat: 2 g
- Unsaturated Fat: 2 g
- Trans Fat: 0 g
- Carbohydrates: 32 g
- Fiber: 2 g
- Protein: 7 g
- Cholesterol: 13 mg